安装Ubuntu系统(包含Nvidia驱动)
CPU: i7-14700K
显卡: GeForce RTX 4060 Ti 16 g
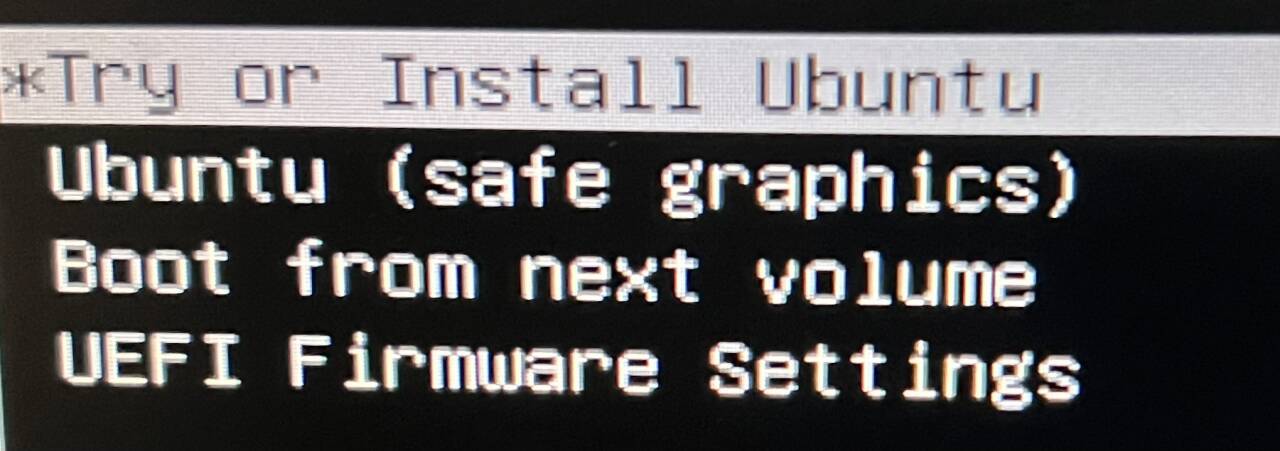
U盘启动后选项如下:
失败记录:
选择Try or Install Ubuntu无法进入安装界面,一直停留在Ubuntu的加载界面;
选择Ubuntu(safe graphics)进入安装,但过程中失败,通过log发现有联网需求,之后操作选择使用有线网络;
重复几次后,突然前两种安装+是否添加nomodeset共四种方法均无法成功安装,选择清空硬盘和U盘并重制启动U盘;
安装Ubuntu后再次启动一直黑屏无反应,后来将HDMI从显卡换到主板上解决。
步骤:
由于采用双硬盘双系统的安装策略,所以先拔掉装有Windows的硬盘,防止EFI装在同一块硬盘上。
选择Ubuntu(safe graphics),按E进入配置,在quiet splash后面添加nomodeset参数,之后按F10进入Ubuntu 24.04的安装。
nouveau是通过逆向得到的非官方的Nvidia驱动,该驱动可能在一些较新的显卡上工作不正常,通过nomodeset来禁止加载该驱动,防止引导时黑屏。
安装后重启拔掉U盘,此时将HDMI换到主板相应接口,否则一直黑屏。
此处针对黑屏的参考资料中提到同样在Ubuntu引导界面进行如上屏蔽nouveau的操作后可以正常进入,但我也没有显示引导界面,完全黑屏,换到主板接口后则无需操作的正常进入系统。
进入系统后需要完全禁止nouveau,使得之后可以自动屏蔽该驱动。之后重启,可以将HDMI重新接到显卡接口。
1 2 3 4 5 6 sudo nano /etc/modprobe.d/blacklist.confsudo update-initramfs -u
安装Nvidia官方驱动之前可以先检查是否会更换内核版本,我的版本中无线网卡未成功工作,升级了Linux内核版本,但由于安装后的Nvidia驱动在切换版本后不生效,所以后来进行了卸载重装,具体留在无线网卡部分。
之后安装Nvidia官方驱动,在官网下载对应显卡的驱动程序。此时直接运行会遇到各种问题:
1 2 3 4 5 6 7 8 9 10 11 12 13 14 15 16 17 18 19 sudo dpkg --add-architecture i386sudo apt updatesudo apt install libc6:i386sudo apt install libglvnd-devsudo apt install pkg-config
所以安装前先进行下载:
1
2
3
4
5
6
7
8
9
10
sudo dpkg --add-architecture i386sudo apt updatesudo apt install libc6:i386sudo apt install build-essential libglvnd-dev pkg-configsudo telinit 3sudo bash NVIDIA-Linux-x86_64-550.107.02.runsudo reboot
驱动安装完成。
中文输入法 在 Settings 的 Region & Language 中安装汉语,应用并重启。
在Keyboard中添加拼音键入。
卸载snap(安装Chrome) 先安装Chrome(之后需要卸载snap版的Firefox),下载deb包,调用sudo dpkg -i xxx.deb安装即可。
卸载snap:
删除已安装的 Snap 软件。
1 2 3 4 5 6 7 for p in $(snap list | awk '{print $1}' ); do sudo snap remove $p done 'snap install hello-world' .
(删除 Snap 的 Core 文件)
1
2
3
4
5
sudo systemctl stop snapd sudo systemctl disable --now snapd.socketfor m in /snap/core/*; do sudo umount $m done
删除 Snap 管理工具
1 sudo apt autoremove --purge snapd
删除 Snap 的目录
1
2
3
4
5
rm -rf ~/snap sudo rm -rf /snapsudo rm -rf /var/snapsudo rm -rf /var/lib/snapdsudo rm -rf /var/cache/snapd
禁止 apt 安装 snapd
1
2
3
4
5
sudo nano /etc/apt/preferences.d/no-snapd.pref
安装Clash Clash_for_Windows资源站:https://archive.org/download/clash_for_windows_pkg
下载并解压
1
2
3
4
tar -zxvf Clash.for.Windows-0.18.5-x64-linux.tar.gzmv Clash.for.Windows-0.18.5-x64-linux clashcd Clash
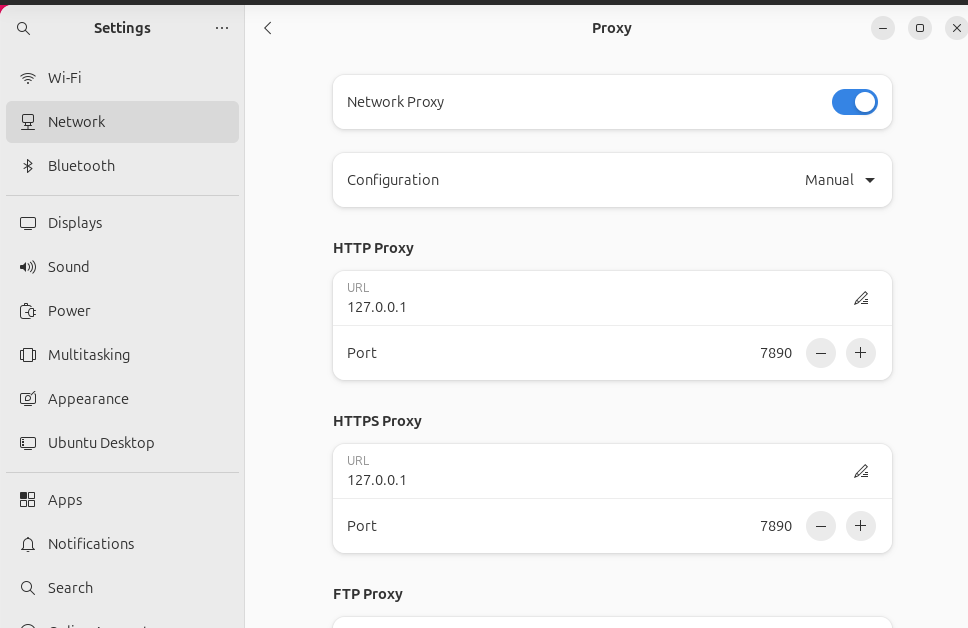
导入订阅
设置系统代理
美化主题 美化项:
图标主题:更改图标主题将更改应用程序图标的外观,最好选择支持各种应用程序的图标主题,否则可能会看到一些图标外观保持不变甚至看起来不合适。
GTK 主题:GTK 是用于构建应用程序的图形用户界面的框架。基本上,它决定了应用程序界面的外观(前提是这个应用程序是 GTK 应用程序,大部分的系统应用程序都是 GTK 应用程序)。
GNOME Shell 主题:更改 GNOME Shell 主题将更改 Shell 元素,例如顶部面板、活动概览、桌面通知等。
光标主题
环境安装:
1 2 3 4 5 6 sudo apt install gnome-tweakssudo apt install chrome-gnome-shellsudo apt install gnome-shell-extensions
在扩展中,启用User Themes后可以在Tweak中进行Shell主题的更改,启动Dash to Dock后可以灵活美观的控制Dock栏。
主题下载地址:https://www.opendesktop.org/
存放位置:
终端 安装Zsh并使用其作为Shell
安装Zim并借助其安装p10k主题以及其他插件,见Shell文章
更换Linux内核 板载无线网卡无法使用,由lshw命令可以得到无线网卡品牌为WCN785x Wi-Fi 7(802.11be) 320MHz 2x2 [FastConnect 7800],对比下面的以太网,该无线网卡没有合适的驱动程序。
1 2 3 4 5 6 7 8 9 10 11 12 13 14 15 16 17 18 19 20 21 22 23 24 25 26 27 28 29 30 31 32 33 34 35 36 37 38 39 40 41 id : 0id : 0yes driver=igc driverversion=6.8.0-39-generic duplex=full firmware=1073:8754 ip=192.168.1.2 latency=0 link =yes multicast=yes port=twisted pair speed=100Mbit/ssudo dmesg
通过查阅相关问题 ,得知可以通过更换最新稳定版的Linux内核(提供了相应的Wi-Fi 7的驱动)来解决。
查看当前内核版本:
1
2
uname -r
安装最新的稳定版内核:
1 2 3 4 5 6 7 8 9 10 11 12 13 14 15 sudo dpkg -i *.debsudo rebootuname -r
更换到6.10.2版本的内核后,可以搜索到无线网络,表明驱动正常工作。但是,nvidia-smi失败,更换Linux内核版本会导致Nvidia驱动发生问题,所以可以先选择合适的内核版本。
1
2
3
4
5
6
nmcli device status
从当前存在的内核版本间切换:
1 2 3 4 5 6 7 8 9 10 11 12 13 14 15 16 17 18 19 sudo grep menuentry /boot/grub/grub.cfgif [ x"${feature_menuentry_id} " = xy ]; then "--id" "" export menuentry_id_option'Ubuntu' --class ubuntu --class gnu-linux --class gnu --class os $menuentry_id_option 'gnulinux-simple-dbc01096-0009-4726-8fa2-076494d33602' {'Advanced options for Ubuntu' $menuentry_id_option 'gnulinux-advanced-dbc01096-0009-4726-8fa2-076494d33602' {'Ubuntu, with Linux 6.10.2-061002-generic' --class ubuntu --class gnu-linux --class gnu --class os $menuentry_id_option 'gnulinux-6.10.2-061002-generic-advanced-dbc01096-0009-4726-8fa2-076494d33602' {'Ubuntu, with Linux 6.10.2-061002-generic (recovery mode)' --class ubuntu --class gnu-linux --class gnu --class os $menuentry_id_option 'gnulinux-6.10.2-061002-generic-recovery-dbc01096-0009-4726-8fa2-076494d33602' {'Ubuntu, with Linux 6.8.0-39-generic' --class ubuntu --class gnu-linux --class gnu --class os $menuentry_id_option 'gnulinux-6.8.0-39-generic-advanced-dbc01096-0009-4726-8fa2-076494d33602' {'Ubuntu, with Linux 6.8.0-39-generic (recovery mode)' --class ubuntu --class gnu-linux --class gnu --class os $menuentry_id_option 'gnulinux-6.8.0-39-generic-recovery-dbc01096-0009-4726-8fa2-076494d33602' {"Memory test (memtest86+x64.efi)" --class memtest $menuentry_id_option 'memtest86+' {'Memory test (memtest86+x64.efi, serial console)' --class memtest $menuentry_id_option 'memtest86+-serial' {'UEFI Firmware Settings' $menuentry_id_option 'uefi-firmware' {sudo nano /etc/default/grub"1> 2"
参考:
如何在Ubuntu 20.04 Linux上安装NVIDIA驱动程序
NVIDIA显卡的Ubuntu驱动程序安装方法
删除 Snap 的方法
Ubuntu 配置clash的四种方式
Ubuntu 23 安装Gnome主题
GNOME 桌面美化
How to Install Themes in Ubuntu Linux
Issue with Wireless Network Connection on Ubuntu 24.04 LTS
How to upgrade Ubuntu to 24.04 and kernel to latest version